[DIY] Photo Canvas with Texture

A long time ago, I had a love-at-first-sight when I saw this beautiful room with large canvas photos from houzz.
Eclectic Living Room by Sandy Media & Bloggers Michelle Hinckley |
This is from 4men1lady & on her faq page, she mentioned where she got this large photo canvases from. So I clicked the link and I almost passed out with how insanely expensive photo canvases are! I was kind of looking at 16×20 and it is $450, although you can really tell the quality of it, really beautiful, but the price? not so beautiful. Though on other stores like shutterfly, 16×20 are something like $89.99.
From then on I have been searching high and low on how to diy photo canvas. Okay, I’ve seen a lot of tutorials but the only thing that is missing is the real canvas texture. Until I found Carrie This Home’s tutorial, now this is what I am talking about!
Then I got so excited! Okay, I got ecstatic!
Here’s my steps:
1) Put a painter’s tape on the back of the blank canvas to avoid overpaint. Although it may not be seen but the ocd in me just can’t stand the thought that the back of the canvas had overpaint.
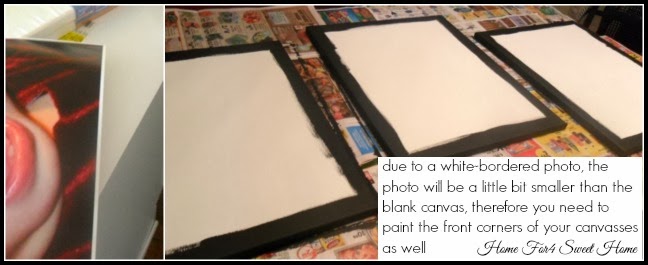
2) Paint the edges of the canvas all the way to the front corners of the canvas because my photo prints came in with white borders so it is going to be smaller than my canvas. Allow the paint to dry, I waited overnight on mine.
3) Once the paint is dry, you may now start putting a thin layer of mod podge to the blank canvas using the foam brush. Pay more attention on making sure that the edges & the corners of the canvas have mod podge.
4) Allow the glue to breathe a little bit then you may now gently place your photo to still wet with mod podge canvas. Since I did not want any fingerprints on the photo, I used a wax paper while pressing down the photo to the canvas.
When the photo is all adhered to the canvas, I thought it was so beautiful already.
You might be tempted of stopping after this step – but please don’t – THE BEST IS YET TO COME.
**Allow the photos to sit overnight, I did not rush my process, because I wanted it to be perfect. So be patient.**
5) Finally, the fun part. Adding texture to the photos, to get that real canvas texture. Pour mod podge somewhere on top of the photo, then using foam brush, spread it all over the photo, sparing nothing. Just like the picture below.
**Make sure that you are distributing the mod podge EVENLY all through out the photo.**
6) Quickly roll over the dry foam roller to the wet with mod podge photo. Make sure to only roll it over in one direction, if you want horizontal-keep horizontal or if you want vertical-keep vertical. Mine was only vertical direction. Roll your foam roller as much as you can to ensure that the mod podge is all the way spread out while gently pressing the foam roller at the same time.
**Make sure that there is no debris trapped on your mod podge, no bubbles & no streaks, you want it to be flawless but milky.**
Here’s some photos for you to visualize what it should look like after foam rolling.
7) Allow the canvasses to dry. Once they are dry, you will be amazed how beautiful it all turned out!
Here’s mine look like once dried.
Now I’ve got to figure out where these babies need to go♥
All in all, I am impressed and then guess what? The Mr. is as impressed as me too! Spent about $10 on each photo canvas compared to $89.99 or even more to $450!
Thanks for reading and until then. XO.


You May Also Like

❗Pedestal Sink Faucet & Drain Replacement Pop Assembly | DIY by Real Regular Homeowner | July 2020❗
July 9, 2020
How to Install Over the Range Microwave [GE JVM3160 DFWW]
June 20, 2021


